How to Write a Zotero Translator:
A Practical Beginners Guide for Humanists
By: Adam Crymble


Chapter 5: XPaths (Directions)
This Chapter
- XPaths (the directions)
- A Note on Frames
- How many do you need?
- Practice
- What you should understand before moving on
- Further Reading
The term XPath refers to two things, and you're going to use both to write your translator:
- the continuous chain of related nodes that can lead to a desired node (directions).
- the JavaScript object that holds the contents of the nodes captured by following an XPath (container). To truly understand these we'll have to introduce a little bit of JavaScript, so we'll save that until Chapter 11.
First, we'll look at an XPath as a set of directions, since that is most closely linked to what you just learned about the DOM in Chapter 4.
XPaths (the directions)
You have already learned how to create a chain of nodes in Chapter 4. Now you have to put what you've learned into a form that JavaScript can understand.
The easiest way to do this is with Solvent, the Firefox add-on you downloaded earlier.
Before you begin with Solvent, let's make sure we're looking at the same webpage. This will make it easier to follow along.
This tutorial will use the Sample Pages on which to practice. The first Sample Page is a bibliographic entry for Method and Meaning in Canadian Environmental History. If your monitor setup is large enough, it is probably best to open the sample page in a new Firefox window so you can continue to follow along. If not, open it in a new tab.
Solvent
To open Solvent, click on the  in the bottom right corner of the Firefox window.
Now, the Firefox browser should look something like this:
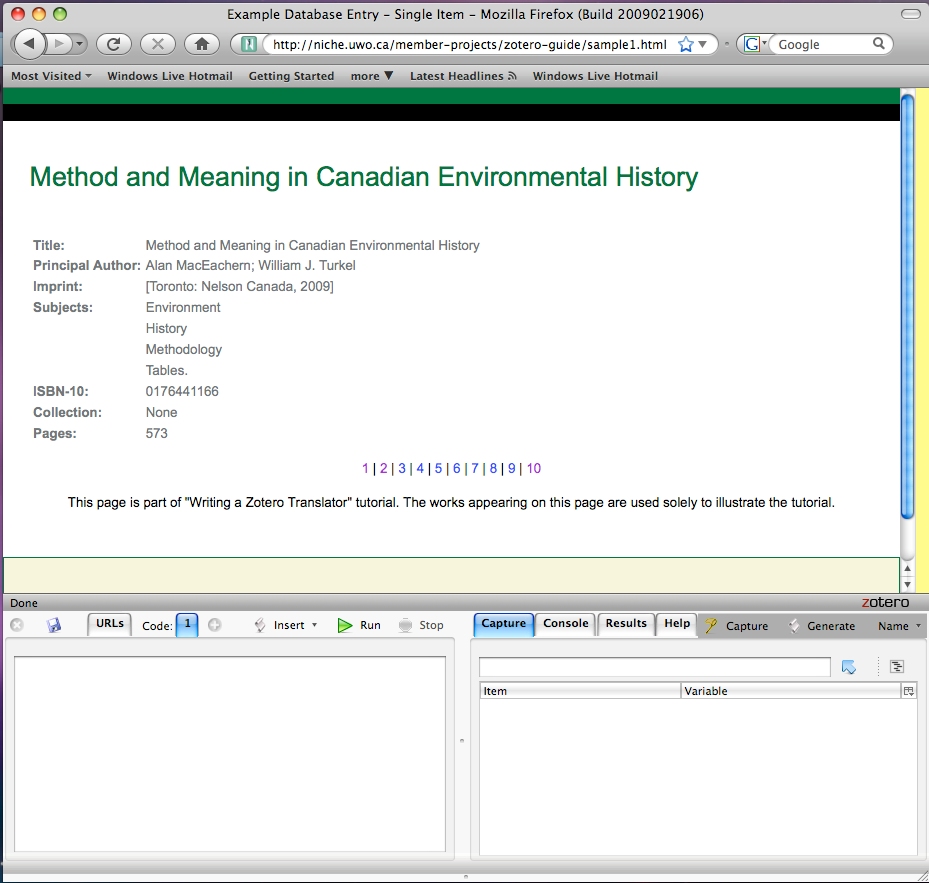
Fig 5.1: Solvent opens at the bottom of the Firefox window
Click on the  button at the top of the Solvent window. Notice that when you move the cursor around the page, various parts highlight yellow. These are nodes that Solvent can create an XPath for (point to).
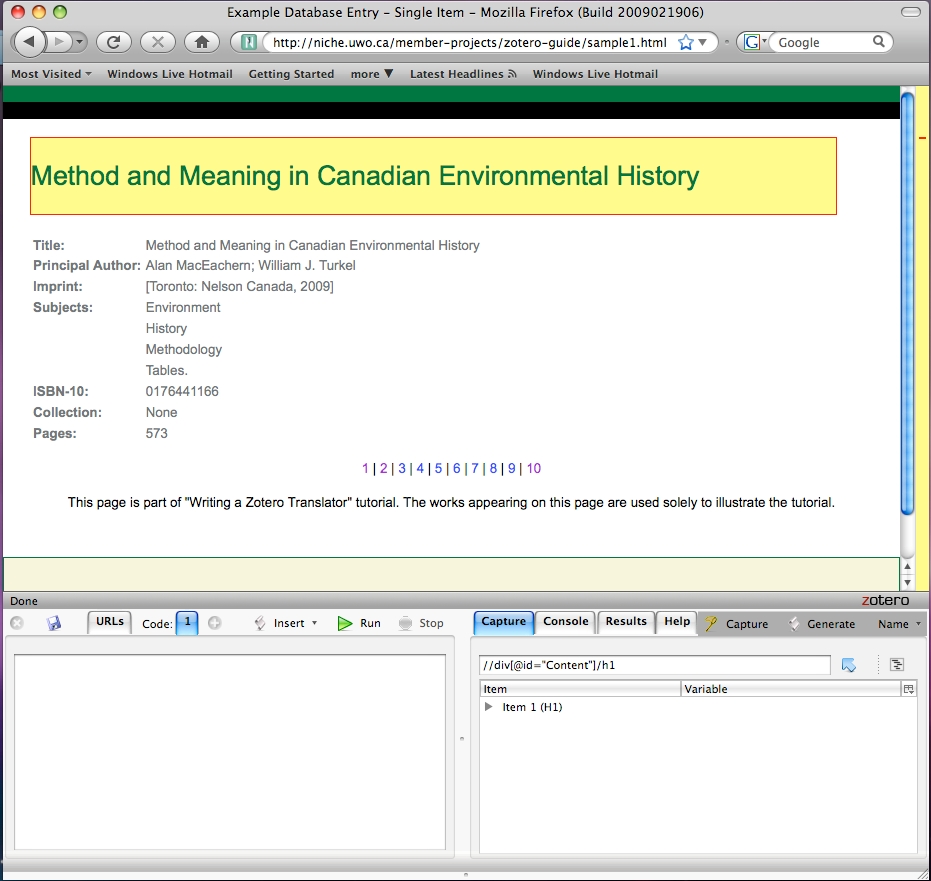
Fig 5.2: The Title highlights when you hover over it
In this example, the Title of the article has been clicked. In the bottom right window notice two things have changed. First, the narrow box at the top contains some text. This is the XPath to the title of the book.
Second, in the larger box, there is something that reads "Item 1 (H1)" This tells us that Solvent has found 1 item on the page that shares this exact XPath and that it is found in a <h1> tag. If the item were part of a table, it would read (TD) for table data, instead of (H1).
Just as in the previous chapter, it is possible to have a set of directions that points to more than one node. On well formatted tables, this allows you to capture many desired items at once.
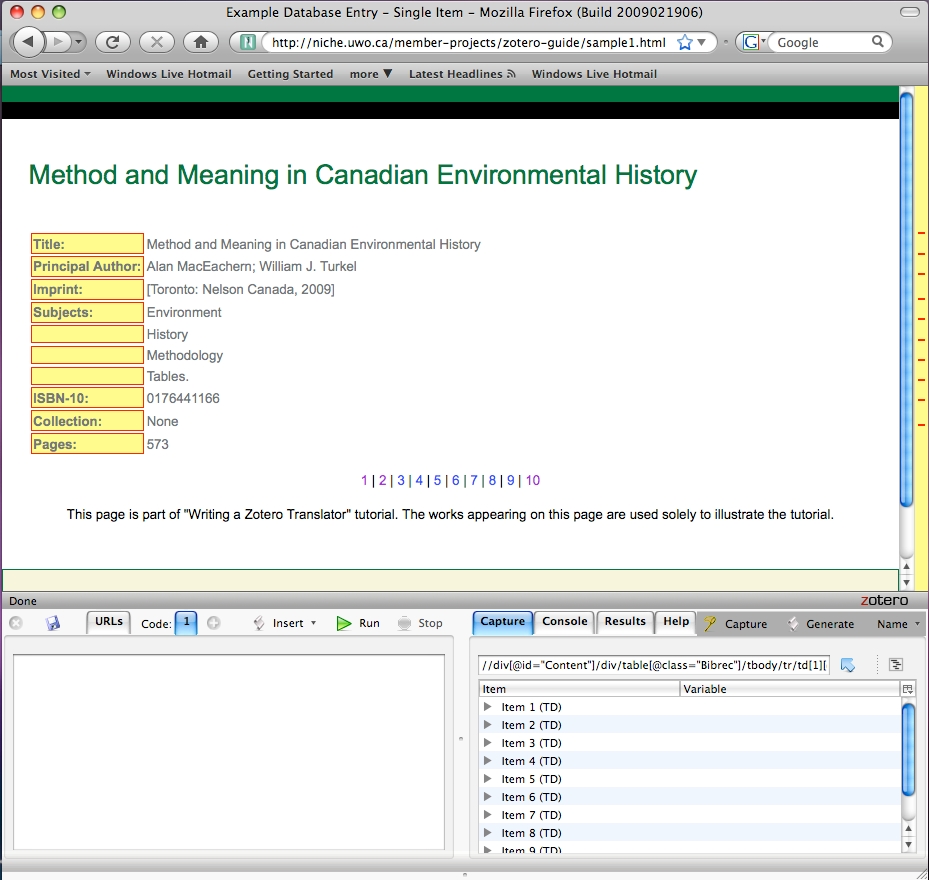
Fig 5.3: You can grab more than one node with Solvent
Click capture again and move your curser around the screen highlighting different areas to get an idea of which nodes are connected to each other, and which nodes share the same XPaths.
XPath Syntax
Solvent is an amazing tool, but sometimes it won't capture the exact nodes you were hoping for. There are a few ways to tinker with the results to get something more desirable. But in order to do that, you've got to learn XPath syntax, i.e. the proper way to write an XPath.
Select the headings as you see in figure 5.3 above. Now you can break the XPath into its basic parts. The XPath found in the Solvent window should be:
Example 5.1
//div[@id="Content"]/div/table[@class="Bibrec"]/tbody/tr/td[1][@class="Label"]
This XPath contains six (6) element nodes and reads from left to right. The last element node is the one that contains the information you want to capture.
If you wrote it as you wrote the descriptions in the last chapter, it would look like this:
Example 5.2
<div> → <div> → <table> → <tbody> → <tr> → <td>
There are a couple changes from how you wrote the path in the last chapter; XPaths are made up of four main building blocks:
- HTML Elements ( div, table, etc.)
- Delimiters ( // and / )
- Attributes ( [@xx='xxxx'] )
- Node Specifiers ( [1], [3], etc.)
HTML Elements (div, table, etc.)
You probably already recognize these; especially those related to HTML tables. These are the nodes you are asking your program to follow through the DOM to the last element node. The last node contains the information you want captured.
There are no special characters or formatting used to denote the HTML elements in the XPath. Simply write them as you would in HTML, but remove the < > tags.
If you haven't done any web design, there is something that you may not have come across before, but will see a lot in XPaths. These are "div" nodes. <div> is short for "division" or "divide." <div> isn't a mathematical operation, but a common HTML element used by web developers to split the webpage into manageable chunks of content that can be organized and moved around more easily. When you view a well designed web page, you will not notice the <div>s but, without them the page would be much more difficult to create. This is more important for web developers than for web users. You don't really need to know how to use a <div>, just note that it is a node in the DOM that acts like a container.
Delimiters ( // ), ( / )
XPaths should start with two slashes ( // ) and subsequent element nodes should be separated by one slash ( / ).
You may be wondering where the <html> and <body> are in this XPath. The two slashes ( // ) are a special character, that allows you to skip these nodes and start searching farther along the DOM hierarchy. Since all nodes share the same first two nodes, adding them to the XPath is a bit redundant; you can safely assume that they need to be followed. In fact, the two slashes tell the program to start the search at any occurrence of the first listed node, no matter where it appears in the document.
In the example, the program will start at the root node and look until it finds something that matches div[@id="Content"]. Once it finds that node, it will cross-reference that node's child nodes to the next node of the XPath (listed after a single [ / ] slash), looking for a match. If the second node matches, the program will continue onto the third and so on.
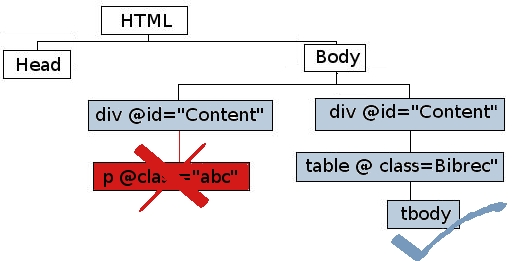
Fig 5.4: How Delimiters Work
If the second node does not match, the program will go back to the first node of the XPath and continue checking the document for another div[@id="Content"] node. This is particularly helpful if you need to grab multiple nodes that share a common XPath after a particular node, but have different XPaths higher in the DOM hierarchy.
Therefore, always make sure your XPath begins with two slashes. If you do not, you will get an error message when you try to get information out of the XPath container.
Using the above example, if you did not start the XPath with two slashes, the program would check the first node in the DOM and see if it was <div>. As all HTML pages have the same root node: the document (<html>) the XPath would not match. Adding the two slashes tells the program to keep looking until a match is found for the first listed node.
Practice: Try removing the double slash from the beginning of the XPath in your Solvent window. What happens to the highlighting? Does anything noticeable happen if you add a second slash to one of the other nodes? Why wouldn't you want to do this?
Attributes ( [@xx='xxxx'])
Attributes are often added to HTML documents to help developers sculpt how an element node will look to a viewer. This practice is known as using Cascading Style Sheets (CSS). This allows for the great diversity in web designs that you see online. CSS attributes give developers far more control over appearance by allowing a single element type to take on one of infinite combinations of looks defined by the developer.
All HTML elements have a default appearance. If you create a header element using <h1></h1> tags, that header will appear in a standard way. Fairly large bold text. If you wanted to change how that header looked, you would use CSS. Using CSS, you could create multiple designs for that same <h1> element; these designs are known as "styles." You could have a Pink one, a Times New Roman one, an Underlined one, a really small one; whatever you want. Your <h1> tag just became a lot more versatile. In your CSS file, which normally users do not see, you would give each one of these styles a name. The name can be almost anything and you can't always figure out what a style does by the name alone. Then, when you wrote your HTML document and created a header you wanted to be pink, you would write it something like this:
Example 5.3
<h1 class="pinkVersion">My Pink Header</h1>
where "pinkVersion" is the name of the style that you had defined in your CSS document.
You do not need to know how to write CSS styles, but you will have to know how they affect the XPaths you will be using.
CSS attributes become part of the DOM and allow you to be more or less specific about your search of nodes by either including or excluding the attribute in the XPath. The most common CSS types that you will encounter are "class" and "id." CSS attributes allow you to differentiate between element nodes that would otherwise look identical.
/div[@id="Content"] and /div[@id="Footnote"] are different in the eyes of an XPath. However, by removing the attribute declaration they become the same: /div.
Solvent by default includes the attributes with the nodes. In our example, three of the nodes have attributes attached to them.
Example 5.4
- div[@id="Content"]
- table[@class="Bibrec"]
- td[@class="Label"]
You can learn more about how CSS works at W3Schools, but for our purposes, all you need to understand is that anything following the pattern: [@xx='xxxx'] is a CSS attribute declaration attached to the node.
Practice: Try removing the attribute associated with the <table> node from the window in Solvent. Did anything change? How many nodes matched the XPath prior to removing the attribute? How many are there after? Why is this?
One important thing to remember is that under most circumstances, the last node of your XPath cannot end in an attribute. Even though Solvent tells you that your desired node has this attribute, it must be removed since your XPath will capture this attribute rather than the contents of the element node. Once you learn how to use XPath containers, inputting an XPath like the one you are using above will result in an error that tells you your XPath container "contains no properties." This means that you did not capture any element nodes with your XPath. In this case, you can solve the problem by simply deleting the attribute from the last node. Note, this will not solve the problem if your XPath does not match the DOM of the page you are viewing (probably caused by a typo, by deleting too many nodes and attributes, by using the wrong nodes and attributes, or by using incorrect node specifiers — all of which are explained further below).
Example 5.5
//div[@id="Content"]/div/table[@class="Bibrec"]/tbody/tr/td[1][@class="Label"]
After removing the last attribute would become:
//div[@id="Content"]/div/table[@class="Bibrec"]/tbody/tr/td[1]
Node Specifiers ([1], [2], etc.)
In the last chapter, you said you wanted the 2nd <tr> → 2nd <td> to get the "Cool" cell. In XPaths, you use node specifiers to do this.
In our sample XPath, we have one node specifier in the last node:
Example 5.6
/td[1][@class="Label"]
This tells us we want the first <td> node that meets all the criteria in the previous nodes. In XPath syntax, this specifier must appear after the HTML element and before any attributes.
Practice: If you havn't already, remove the attribute from the last node:
Example 5.7
//div[@id="Content"]/div/table[@class="Bibrec"]/tbody/tr/td[1]
Now try changing the node specifier to [2]. What changed? What happens if you add a node specifier after the /tr node?
Which nodes are relevant?
It is a good idea to make XPaths as short as they possibly can be. This leaves the least possible chances for the XPath to fail, or return an undesired value. It also makes your code cleaner to the eye.
Sometimes, XPaths contain redundant information. If there is only one table on the page, you don't need directions how to get to the table.
Example 5.8
//div[@id="Content"]/div/table[@class="Bibrec"]/tbody/tr/td[1]
becomes
//table[@class="Bibrec"]/tbody/tr/td[1]
Try this in your Solvent window. You shouldn't have seen any change at all. That's because this shorter XPath still points to exactly the same place; you've just removed some unnecessary instructions. See how short you can make the XPath before the result changes.
When creating XPaths to use with your translator, try to remove as many redundant nodes as possible. Never cut nodes from the middle of an XPath (unless you know what you are doing). Always cut from the ends, and if you want to remove a node, you must cut the entire node (everything between the set of slashes). If you are removing an attribute or node specifier, always remove the whole thing; removing random letters will just result in a useless XPath.
Experiment with Solvent when creating a new XPath. Removing nodes in the Solvent window will show you if you have removed too many.
It is also a good idea to test your XPath on multiple pages of the same website. For your translator to work, the XPath has to work on all entries. Try pasting your XPath into the Solvent window when viewing this page for Canadian Environmental History: Essential Readings. Does it still work?
If you're having trouble isolating the node or nodes you're looking for, try removing various combinations of attributes. If you are working with a table, try adding a node specifier after the /td node, eg. /td[3]. There might have be a row or column in the table that you didn't see which caused your XPath to capture an unexpected node.
A note on frames
If the site for which you are writing a translator uses frames, Solvent will appear not to work when you try to create an XPath. Don't worry, we can get around this. Right click on the frame that contains all the information you want to scrape and select This Frame > Show Only This Frame. Solvent should now work normally.
How many XPaths do you need??
You will use as many as it takes to capture all the nodes with information you need to create your citation. If you have a site that uses a well designed table containing all the data, chances are you will only need one or two XPaths. Unfortunately, many sites are not well designed, and in some cases you will need one XPath for each piece of bibliographic information.
In other cases, your site may have different formats for different types of entries. Journal article citations may appear in a table format, whereas book citations may appear as a paragraph of text. Many newspapers have multiple article formats which are dependent upon things like whether the article was written on a writer's blog or as a feature in the paper. If this is the case, you will need to use different XPaths for each format.
How many XPaths will you use? As many as it takes.
Practice:
- See if you can highlight only the "Imprint:" field.
- Try to capture both "Imprint:" and the column to the right which contains the imprint data using the same XPath.
- Try out Solvent on a few other webpages to see if you can master capturing various pieces of information. Newspapers are great pages on which to practice. Remember, you should be able to capture almost any node that outputs something to your screen.
What you should understand before moving on
- Understand the four components used to write XPaths (HTML elements, delimiters, attributes and node specifiers) and how they can be added or removed from an XPath to isolate desired nodes.
- How to create an XPath using Solvent, for any node you want to capture.
- How to use Solvent on web pages that use frames.